Translate this page:

How to use ORSOT as a Student


Important Guidelines for the Effective Use of ORSOT as a Student
| Steps to becoming the complete ORSOT student | Find out how |
|---|---|
| Step 1. How do I set up my account page? | See Details |
| Step 2. Finding a subject | See Details |
| Step 3. Enrolling in a Subject | See Details |
| Step 4. How to access my learning resources | See Details |
| Step 5. How to register for an online class | See Details |
| Step 6. How to attend an online class | See Details |
| Step 7. How to communicate with my teacher and other students | See Details |
| Step 8. How to notify of my online class absence | See Details |
| Step 9. How to enrol in a rescheduled class | See Details |
| Step 10. How to use the Student Help Desk | See Details |
| Step 11. How to assess my teacher's teaching | See Details |
| Step 12. How to make a complaint | See Details |
Step 1: Setting up your ORSOT account
Once a student enrols with ORSOT, they are able to log into the site and enter their own account. When you first log into ORSOT/TM2, you will notice the following:

The areas outlined by the red boxes are as follows:
a. Your account logo. Click on "My Account" to enter your account .
b. "My Subjects" link. Click on this to see the subject or subjects you are enrolled in.
c. The Notifications Bell. This indicates if you have any messages. These messages can come from friends and colleagues enrolled in the same subjects as you or from your teacher. Click on the bell to read, and also to respond to messages.
Your Account details:
When you enter your account, you will notice several features, with the main features enclosed in a green box:

i) The arrow at the top allows you to return to the Home page, where you can access the link to your subjects, and check for messages
ii) The "Notifications" link should always be on, allowing you to receive and send messages
iii) "Billing" is where you check your payments.
iv)"Profile Picture" is where you can upload your photo, or favourite avatar, and underneath this is where you fill out your details.
v)"Password" is where you can change your password. You are able to change the temporary password you received when you first registered with TM2.
Step 2: Finding a Subject
Currently, ORSOT offers subject tuition in only Mathematics and Science. However, TM2 offers hundreds of subjects occur in any one of 9 distinct Categories. A Category contains many similar subjects eg the Secondary School Category, Languages etc. If you wish to enrol in a TM2 subject,please contact us and we will endeavor to find a qualified tutor for you.
Option 1: Use the "SUBJECTS" drop- down menu on the Home page. Choose Gallery or Index (for all subjects), or a certain Category. As follows:

Simply click on an option, and search for your subject within that option, OR
Option 2: Choose the "Category" for the subject on the Home page, and scroll through the subject cards within that particular category, OR
Option 3: Click on "browse all subjects" on the Home page. This will take you through to the "Subject Gallery" for All Subjects. This option opens you up to all the subject cards, and if you know the name of your subject you can use the Search Bar and search within "All" for that subject. Or, you can scroll down through the categories, select a category, and search for your subject within that category. The set-up is shown as follows:

Option 4: Click on the "Subject Index" on the Home page will take you to the links for all subjects. Scroll down the alphabetical subject list in a category, locate your subject, click the link and go straight to the subject page. To enrol in a class for a subject, you pay the tuition fee as specified on the subject page. (this is further discussed in step 3 below).
If your subject has "Teacher Required" on it subject card, or "We are currently waiting on a qualified teacher for this subject" on the subject page, please contact us through "TM2 Member Support" and we will advertise for a teacher for that subject through our Newsletter, Social Media and "Teachers Wanted" option. When a suitably qualified teacher becomes available, we will email you to advise you of the situation, OR
a) on the Home page menu, you can check the current subjects on offer by clicking on the "Teachers Available" option. Find a subject you like? Click on the "Enrol in a Subject" , and complete the required details, OR
b) on the Home page menu, under the "Live Classes" option, click on "Upcoming Live Classes" to see the subjects currently on offer, and click " Book My Spot" if there is a subject in which you would like to enrol. Then, if you are already a TM2 student, click "I am a TM2 Registered Student" and complete the required information. If you are not a TM2 student, select "I need TM2 Registration", name the subject you need in the form, as well as completing the other information for TM2 membership.
When choosing a subject for online tuition, students should carefully consider time differences which may exist between where they live and the scheduled time of lessons for that subject , and plan accordingly. If the teacher lives in a different time zone to you, then you will have to adjust the scheduled lesson time to coincide with your local time. For example, if a teacher based in New York USA (UTC -4) schedules a lesson for 3 pm. This means an 8 pm lesson start for their student who is based in London UK ( UTC+1). You can use the time zone converter page to help you work out time differences. Time Zones are prefaced by the initials UTC (Coordinated Universal Time).
Step 3: Enrolling in a Subject with either ORSOT or TM2
Once you become registered as a student with ORSOT, you are then free to enrol for online tuition in any subject you choose by paying the tuition fee as advertised by the teacher of that subject.
There are five options available in which to enrol in online tuition for a subject:
1. Go to the "Live Classes" menu option, click on "Upcoming Live Classes", then select "Book My Spot", and if you are already a ORSOT student, click "I am a TM2 Registered Student" and complete the required information. Then go to the subject page and pay the advertised fee to enrol in tuition for that subject.
2. If you already know your subject and teacher, select the "Book My Spot" option on the Home page, and follow the procedure as described in option 1.
3. Go to "Teachers Available" on the Home page, select the teacher and subject you want, click "Enrol in a Subject", then select "I am a Registered TM2 Student", and complete the details on "Teachers Available Subject Booking". Then go to the subject page and pay the advertised fee to enrol in tuition for that subject.
4. Select a subject category, and select a subject within that category. If the subject card includes a teachers name, then click the card to go to the subject page, which will have all the tuition details for that subject. Pay the advertised tuition fee, and you are enrolled in that subject.
5. Choose .."Browse all Subjects"..or the "Subject Index", on the Home page. In either case, scroll through the hundreds or subjects on offer. For the Gallery option, if a subject card has "Teacher Required", please contact us and we will advertise for a teacher of that subject. Once a suitable teacher is found, we will advertise the fact on "Teachers Available". In the case of the Subject Index, which takes you to the subject page, if there is the note " We are currently waiting on a qualified teacher for this subject", again, contact us so that we can advertise for a teacher of that subject.
Please note that when you pay the tuition fee for a subject, you are automatically enrolled for all online classes that are included in that fee, as specified on the tuition fee tag.
Once a student pays the tuition fee, the money is held in trust by TM2. When a teacher completes the required lesson or lessons in a teaching sequence, the payment is released to the teacher minus any deductions and a commission to TM2.
The tuition fee notification tells you the amount to be paid, in USD, AUD or Euros, and what is included in that payment. A tuition fee includes ALL online lessons advertised with the fee, and all resources for the subject which are provided by the teacher.
To pay the tuition fee set by the teacher of your subject, click on the fee tab, and you will go to our payment gateway. Here you can pay with any visa, master card or PayPal. You will receive a receipt for payment through your email, and an email from the TM2 team confirming your enrolment in the subject.
Step 4: How to Access my Learning Resources
You access your resources after the tuition fee payment. Once you have clicked on the advertised tuition payment, you will proceed to our payment gateway, pay the tuition fee, then click "Enrol", and go to the subject's Curriculum Page ( your Course curriculum page). Here you will see all the lessons for the subject laid out for you, as is indicated by the following example:


The page on the left contains all the materials and online classes scheduled for the subject. If you click on the "start" for any lesson, in this case lesson 10, the content for that lesson will appear. In this example the lesson contained a message from the teacher and a note about an online class that has finished. The lesson may have also contained resources that you could download, for example power points, reference articles, video clips and much more.
Your resources are always available when you log into your account. You will notices the "My Subjects" option (See Step 1 above) on the Home page menu. Click this to find out which subjects you are enrolled in. Click on your subject, and you will automatically go to your Curriculum page where you can access the resources for any of the lesson's you teacher has planned for you.
Step 5: How to Register for an Online Class
For students registered with TM2, and who have paid tuition fees for a subject, you can register to attend an online class in that subject in any one of several ways:
Option 1: If you are already enrolled in a subject, you can attend an online class in that subject, in either one of two ways:
1) When you log into your account, you will notice the following (as an example) message appearing near your Notifications Bell:

If you check "Going" you will automatically be sent an email to confirm your registration, as illustration by the following example for a senior level Biology revision class:
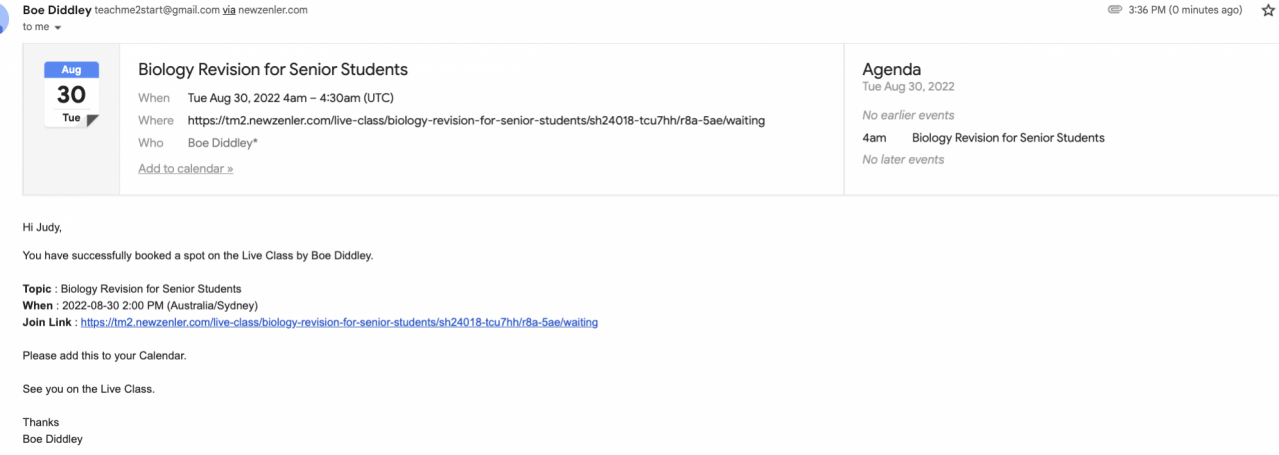
Note that the email has a live link, so that when the time comes for the online class, you can click the link and enter the waiting room for the live class for its commencement.
2) You can also enter your Curriculum page, click to open a lesson, and you will see a notification, as in the following message (example):

Simply, click "Book My Spot", and an email confirmation will be sent to your registered email address, confirming details , as in 1 above.
Option 2: for someone who has already enrolled in a subject, you can also register to attend an online class in another subject, in either one of two ways:
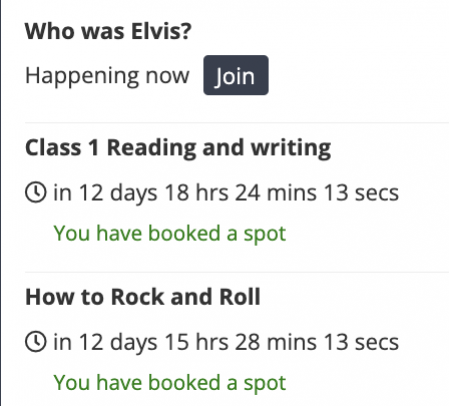
1. Using the Live Class Calendar. Once you log in, go to "Live Classes" on the main menu. Scroll down and click on "Live Class Calendar" to see all the live classes available. The following (as an example) will appear:

Click on the class in which you would like to register, and the following appears( as an example):

Click "Join" and you will be see the URL for the class (you can take a screenshot of this if you wish), and an email from the teacher will automatically be sent to you, with all the information you need, as follows:

Once you pay the tuition fee for the class, by going to the Subject page and clicking the tuition fee tag, you will be enrolled in that class.
2. Again using the "Live Classes" menu option on the Home page, click on "Upcoming Live Classes" and select a class in which you would like to register. Click "Student Enrolment" and enter details. You will be registered for the class, and the teacher notified. Once you pay the tuition fee for the class, as advertised on the Subject page, you will be enrolled in that class.
Option 3: For TM2 students who have not yet enrolled in a subject:
1. Choose a subject as described in Step 2 above, and enrol in that subject as described in Step 3. OR
2. Use the "Live Classes" and "Live Class Calendar" as described in Option 2 (1) above. OR
3. Use the "Live Classes" and "Upcoming Live Classes" as described in Option (2) above. OR
4. Contact the TM2 admin with your request through "Member Support" on the main menu, and then "Help and Support", and we will place you in a class in the subject of your choice.
Step 6: How to Attend an Online Class
To attend an online class, you first must have paid the associated subject tuition fee. This is described in Step 5 above. Please note that when you pay the tuition fee for a subject, you are automatically registered for all online classes that are included in that fee, as specified on the tuition fee tag.
When the online class you have registered for is ready to commence, you can join in any one of three ways:
1) Through the Discussion feed notice near your Notifications Bell. You will notice this when you first log into your account. The pop-up message will appear near your photo or avatar. An example is shown as follows:
Simply click " Join" and you will immediately go to the Zoom page for the meeting
2) Through the Course curriculum page. Log into your account, go to "My Subjects", click on the subject you need, then on the Course curriculum page for that subject, open the lesson box number you need, and you will see the following example:

Click on "Join in Zoom" and you will go to the Zoom meeting page. Notice also that you can click on the link "join from your browser".
3) Through email. When you first register for the online class (see Step 5 above), you will receive an email, an example of which is as follows:

Notice the "Join Link". When it's time to join the online class, copy and paste in your browser search bar, and you will be taken to the "Waiting Room" for the online class, until it commences, or if a live link, simply click for the same result. Please ensure you first pay the tuition fee as advertised on the Subject page.
When you enter the Zoom meeting, you will notice the following requirement:

Enter your name, and click "Join". Easy! Now you have joined the class for the online lesson.

During your online class, you can unmute your microphone and speak at any time. But to reduce background noise during the class, please keep your microphone muted when you are not speaking. You can also write comments or questions in the Chat box at any time . Please make sure your Chat is set to "everyone" so that all member of the class can participate in the discussion. And of course, make sure you share your screen so that you can be seen, just like in a real classroom.
Step 7: How do I Communicate with my Teacher and other Classmates
When you are attending an online class, you can communicate verbally with your teacher and other classmates, as well as using the chat option, as described above.
However, there are other times, when you are not online, and you may wish to communicate with your teacher and other students enrolled in your subject, and this is made possible through different communication feeds through the "Community" option that you will notice when you first log in:

When you click on "Community" it will show you what communities you are enrolled in. There is the TM2 Team community, and any number of subject-based communities, which will include the subject in which you are enrolled. An example of a subject-based community feed is the Agriculture Feed as follows:

You can post comments on any community feed of which you are a member. If you want to join another community, please contact us through "Member Support" on the Home page menu, and then use the "Help and Support" option to contact the TM2 administration.
The other communications option is the Subject Discussion feed, an example of which (Environmental Law) is as follows:


Step 8: How to Notify of my Online Class Absence
It is very important to notify the ORSOT administration if you are unable to attend one or more of your teachers' scheduled classes for your subject. To do so, go to "Attendance" on the Home page menu, scroll down to "Student Absence", complete the required details and submit the form to the ORSOT administration.
You may be entitled to a refund of all or half of your tuition fee you paid for that scheduled lesson or lesson you are unable to attend. The conditions for refunds are specified by the TM2 "Terms and Conditions", clause 11, and are as follows:
11.2 Once the student has undertaken the step of cancellation as described in clause 11.1 above, the following refund conditions will apply:
a. Cancellation at least 7 days ( 7 days or more) before the scheduled start of a particular lesson, course, or period of instruction- full refund.
b. Cancellation at least 2 days ( 2 to 6 days) before the scheduled start of a particular lesson, course or period of instruction- 50% refund
c. Cancellation less than 2 days (1 day to the day of the lesson) before the scheduled start of a particular lesson, course or period of instruction- no refund.
11.3 The refund of tuition fee for cancelled lessons will be calculated as the advertised total tuition fee divided by the number of online lessons included in that tuition fee, multiplied by the number of cancelled online lessons, if the student provided the required 7 day notification.( clause 11.2 a)
11.3.1 In the case of a 50% refund for a cancelled lesson (clause 11.2 b), the calculation is as for clause 11.3 above, but the refund amount is divided by two.
11.4 A student may apply to reschedule a particular lesson, course or period of instruction within a teaching block by communicating this message to their teacher. It is up to teacher discretion as to whether the reschedule request is granted or not.
a. If rescheduling is not possible, and the student cannot attend the lesson, period of instruction or course, then the student must cancel their enrolment in that lesson, period of instruction or course according to the provisions in clause 11.2 above.
b. If a student does not attend a lesson, course or period of instruction as scheduled by their teacher, and without prior notification to the teacher and administration of their non-attendance for that lesson, course or period of instruction within a teaching block, then that student will be deemed to have cancelled their lesson, course or period of instruction within that teaching block according to clause 11.2 c and is not entitled to a refund of their tuition fee for that lesson, course or period of instruction within the relevant teaching block.
In summary:
. at least 7 day's notice of cancellation is required for a full refund of the tuition fee for that missed online class or classes.
. notice of 6 to 2 days of cancellation is required for a 50% refund of the tuition fee for that missed online class or classes.
Please Note: If you are cancelling a rescheduled class, please go to "Live Classes" on the Home page menu, click on "Rescheduled Classes", locate your rescheduled class, and complete the details for "I want to cancel a rescheduled class". You will receive a tuition refund for that rescheduled class or classes (see also step 9 below)
Step 9: How to Enrol in a Rescheduled Class
Your teacher should notify you well in advance if he or she needs to reschedule an upcoming online class. Rescheduled classes are notified to the ORSOT/TM2 administration are posted on the "Rescheduled Classes" drop down option under "Live Classes" on the Home page menu.
When you click on "Rescheduled Classes" you should be able to see the details provided by your teacher, including the new date and time for the lesson. You have two options:
1. Click on " I want to attend a rescheduled class" , OR
2. Click on " I want to cancel a rescheduled class"
Choose option 1, and you need to complete a form to "Reschedule My Lesson Attendance". This will be received by ORSOT who will ensure you are re-enrolled as required.
Choose option 2, and you need to complete a form to " Cancel My Lesson Attendance". This will be received by the TM2 administration, who will organise to refund your tuition fee for this rescheduled lesson to your nominated Bank account.
Step 10: How to use the Student Help Desk
Having trouble with a subject, and seek urgent help to improve your understanding? Maybe you need revision before that important examination? Maybe you urgently need to catch up on missed work at school? Or maybe you are interested in a particular topic or area and seek a teacher to help inspire you? Whatever the requirement and urgency, the Student Help Desk on the Home page is designed to bring tuition services to you in order to support your area of need. Tuition lessons for the "Student Help Desk" will be conducted on either Saturday or Sunday afternoons from 3 to 4 pm, at the same cost as for regular weekly lessons.
To enlist tutorial support through the Student help Desk:
1. Click on " Student Help Desk" on the menu of the Home page.
2. Complete all details as required and submit the form.
3. We will notify a suitable teacher of your needs and contact you. Or if there is no one directly available, we will;
a) Advertise your needs on "Teachers Wanted" on the Home page menu;
b) Advertise your needs in our Newsletter, and on social media posts.
Please note: In the case of 3a) and 3b) we help ensure your privacy by only providing your first name.
Step 11: How to Assess my Teacher's Teaching
On the Curriculum page of your subject there is a review area where you can provide feedback of your teacher's performance during lessons for the subject. It looks like as shown in the following example:

Feedback is very important for a teacher to enable him or her to improve their online practice. The rating is out of 5-stars, and the average number of stars from student feedback is published on the teacher's subject card.
Step 12: How to Make a Complaint
Everyone has the right to feel safe and comfortable when using the tuition services provided by ORSOT. If a student is unhappy, upset or feels threatened or offended in any way during an online class, or in any communication within the ORSOT network of Emails, Communities or Discussion feeds then he or she should report the matter to the ORSOT administration.
The administration will follow up on any complaint provided the claim is genuine and not frivolous or vexatious in nature. The process for making a complaint is as follows:
1. Go to "Member Support" on the Home Page
2. Click on "Help and Support",
3. Complete the details on the "TM2 Member Support" Form ( also for ORSOT students), and;
4. Submit to TM2 Support.